A sagging gate creates multiple problems for homeowners. Gates that drop become hard to open, lock properly, or close completely. Your property security decreases when gates don’t latch correctly. Plus, crooked gates look shabby and reduce curb appeal. Learning how to stop gate from sagging saves you money and frustration over time.
Several effective solutions exist for this common issue. Adding diagonal braces, installing turnbuckles, or attaching support wheels can fix the problem. Many homeowners find that tightening hardware and strengthening posts work well, too. You’ll find most repairs take just an afternoon with essential tools.
Call Commercial Fencing Huntsville AL today for your free property assessment. Our experienced team creates custom solutions that enhance both security and curb appeal.
What Causes a Gate to Drop?
Gates can fall for many reasons. Here’s why this happens.
- Weather damage weakens hinges and posts over time. Call a fencing contractor when you spot rust or rot.
- Improper installation leads to gates that sag or drop. A fence repair contractor can fix alignment issues.
- Heavy use without maintenance strains gate hardware. Regular oiling prevents metal parts from wearing out quickly.
- Ground shifting causes posts to tilt and gates to drop. Soil changes after heavy rain or drought affect fences.
- Low-quality materials don’t last as long. Professional fencing contractors pick the proper hardware for your climate.
How to Stop Gate from Sagging
A sagging gate looks terrible and won’t close right. Let’s fix that problem now.
Fix Gate Hinges
Start by checking your hinges. Loose screws make gates drop down over time. Grab a screwdriver and tighten everything up. Sometimes, you’ll need new hinges if the old ones are bent or rusty. A fencing installation contractor near me showed me this trick: add a third hinge in the middle for extra support on heavy gates.
Force Gate Back to Square
Your gate needs to be square to work right. Use a level tool to check. Push the corner up while a friend holds the other side. Add a turnbuckle to pull corners into place. You might need wooden blocks as a temporary support. Many gates sag because they lost their shape, not because of bad hinges.
Use Quality Materials
Cheap hardware leads to headaches later. Choose galvanized or stainless steel parts that won’t rust. Hardwood lasts longer than soft pine for wooden gates. Metal gates should have thick frames and cross braces. I called a fencing installation contractor near me who recommended spending more upfront on materials to avoid yearly repairs.
Proper Installation is the Key
Gates need strong posts sunk deep in concrete. The post must be at least one-third underground. Leave concrete to dry thoroughly before hanging your gate. Space hinges far apart for better weight distribution. Add diagonal bracing from the top hinge corner to the opposite bottom corner. Your gate won’t sag with this design.
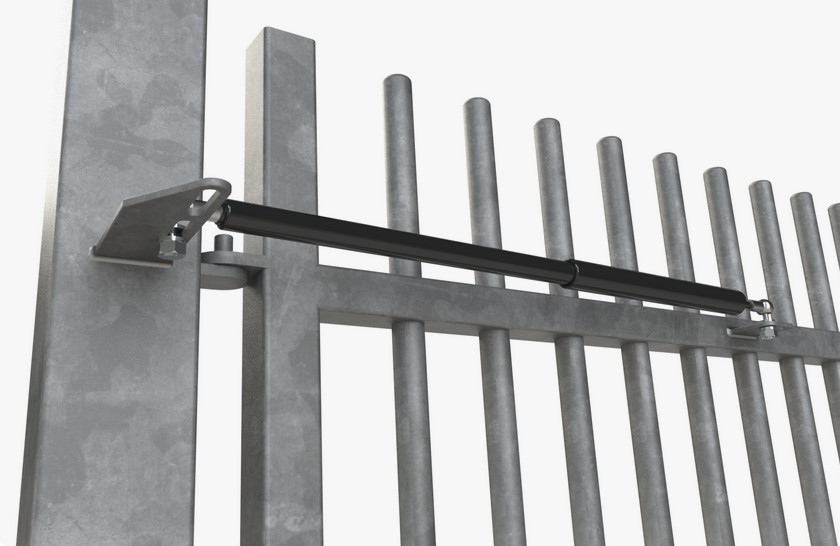
How to Fix a Sagging Gate with a Turnbuckle
A sagging gate is annoying but fixable with a turnbuckle. Let’s get it straight again.
- Step 1: Measure your gate diagonally from the top hinge to the bottom latch. This tells you how much it’s sagging and what size turnbuckle you’ll need.
- Step 2: Buy a turnbuckle that’s slightly shorter than your measurement. Most hardware stores carry these in different sizes and strengths.
- Step 3: Drill holes in the gate corners where you’ll attach the turnbuckle. The top corner near the latch and the bottom corner near the hinges work best.
- Step 4: Install eye bolts in the holes you drilled. Make them tight, but don’t split the wood. A fencing installation contractor near me recommends pre-drilling smaller pilot holes.
- Step 5: Attach the turnbuckle to both eye bolts. Don’t tighten it yet. Just connect everything so it’s ready to work.
- Step 6: Use a level to check how straight your gate is. You want it perfectly square before you start tightening things up.
- Step 7: Turn the center part of the turnbuckle slowly to tighten it. This pulls the corners together and lifts the sagging side.
- Step 8: Check that your gate opens and closes smoothly. You should adjust the turnbuckle a bit more for perfect alignment.
- Step 9: Once everything looks good, add a drop of thread-locking fluid to prevent the turnbuckle from loosening with regular use.
- Step 10: Test your gate several times. If it still doesn’t close right, you might need a fencing installation contractor near me for more complex fixes.
How to Stop a Metal Gate from Sagging
Metal gates can drop down over time, making them hard to open and close properly.
- Step 1: Check all the screws and bolts on your gate hinges. Loose connections are often the main problem. Tighten everything with the right tools.
- Step 2: Look at your gate posts. Are they straight and solid? Wobbly posts can’t hold gates up. You should add concrete around the base.
- Step 3: Add a third hinge in the middle if you only have two. This spreads out the weight better. A fencing installation contractor near me does this for heavy gates.
- Step 4: Install a diagonal brace across your gate. Run it from the top hinge corner down to the bottom latch corner to fight gravity’s pull.
- Step 5: Consider adding a wheel at the bottom corner of the gate. It’ll roll along the ground and take the weight off the hinges.
- Step 6: Measure your gate diagonally from corner to corner. If the measurements don’t match, your gate isn’t square anymore.
- Step 7: Attach a turnbuckle diagonally across the gate. When you tighten it, the gate will return to its square shape.
- Step 8: Check if your gate frame has any cracks or breaks. These weak spots can cause sagging. You’ll need to weld or replace damaged sections.
- Step 9: Apply lubricant to all moving parts. Rusty or sticky hinges create drag that pulls gates down over time.
- Step 10: Talk to a fencing installation contractor near me if these fixes don’t work. Some problems need professional welding or special equipment to be solved.
How to Fix a Sagging Gate with a Wheel
A gate wheel supports the weight and stops sagging.
- Step 1: Measure how high your gate sits from the ground. You’ll need this number to buy the right size wheel.
- Step 2: Purchase a gate wheel kit from a hardware store. They come in different sizes and styles for various gates.
- Step 3: Close your gate completely. Mark where the bottom corner sits opposite from the hinges. This is where your wheel goes.
- Step 4: Clean the area where you’ll attach the wheel. Remove any dirt, rust, or old paint with a wire brush.
- Step 5: Hold the wheel bracket against the gate. The wheel should touch the ground and support the gate’s weight.
- Step 6: Mark the spots for screw holes through the bracket onto your gate. Use a pencil or marker that you can see clearly.
- Step 7: Drill pilot holes where you made your marks. These smaller holes prevent the metal from splitting when you add screws.
- Step 8: Attach the wheel bracket to your gate with the screws from your kit. Make them tight, but don’t strip the holes.
- Step 9: Test your gate by opening and closing it several times. The wheel should roll smoothly and hold the weight.
- Step 10: Adjust the wheel height if needed. Most gate wheels have slots that let you move them up or down.
- Step 11: Add lubricant to the wheel axle. This keeps it turning freely and prevents squeaking when you use your gate.
- Step 12: Check your gate wheel every few months. Wheels can get stuck with dirt or wear down over time.
How to Fix a Sagging Gate with Cable
Using cable is a strong way to pull your gate back into shape.
- Step 1: Measure your gate to find out how much it’s sagging. Look at the gap between the gate and the post at the bottom.
- Step 2: Buy steel cable, two eye bolts, and cable clamps from your local hardware store. Get a cable that can handle outdoor weather.
- Step 3: Find the corners where you’ll attach the cable. Usually, this means the top hinge corner and the bottom latch corner.
- Step 4: Drill holes for eye bolts in both corners. Make the holes slightly smaller than the bolts for a tight fit.
- Step 5: Screw the eye bolts into the holes you made. Turn them until fully seated, with just the loop sticking out.
- Step 6: Cut the cable to length. You want it to reach diagonally across your gate with a few extra inches on each end.
- Step 7: Thread one end of the cable through an eye bolt. Loop it back and attach a cable clamp to hold it firmly.
- Step 8: Pull the free end of the cable through the other eye bolt. Don’t tighten it yet – get it in position.
- Step 9: Have a friend lift the sagging corner slightly. This makes it easier to get the right tension on your cable.
- Step 10: Pull the cable tight while your gate is aligned correctly. The diagonal cable works against the force of gravity.
- Step 11: Secure the second end with another cable clamp. Double-check that it’s tight before you finish.
- Step 12: Test your gate by opening and closing it several times. The cable should hold everything in the correct position.
FAQ
Do anti-sag gate kits work?
Yes, anti-sag gate kits do work when installed correctly. They provide diagonal support that counteracts gravity’s pull, preventing gates from dropping over time.
Wrap Up
Now you know how to stop gate from sagging with several effective methods. Regular maintenance prevents most problems before they start. Check your hinges, posts, and hardware every few months.
Don’t wait until your gate drags on the ground. A minor fix today saves more significant repairs tomorrow. Your gate will stay straight and functional and look great for years.
Visit Commercial Fencing Huntsville AL. Schedule your consultation with our local experts who understand Alabama’s unique needs.