Owners prefer setting fence posts without concrete to save time and money. It’s also a practical option for smaller projects or temporary fences. Concrete can be costly and time-consuming.
There are a few different methods for setting posts without concrete. The most common are using packed soil, gravel, or a combination of both. Each method has its benefits, depending on your needs.
In this blog, we’ll explore how to set fence posts without concrete, the methods to use, and the pros and cons of each.
Looking for reliable fencing solutions for your business? Contact Commercial Fencing Huntsville AL, today for top-quality, durable fences tailored to your needs. Get a free consultation now!
Can You Install Fence Posts without Concrete?
Yes, you can install fence posts without concrete. It’s a reliable option if done correctly. Start by digging a hole slightly wider than the post. Next, place the post and backfill with tightly packed soil. Use a tamping tool to press the soil firmly. Repeat in layers for a solid hold.
Another method is using gravel. Gravel helps with drainage and keeps the post sturdy. Fill the hole with small layers of gravel, tamping each down as you go. This works well for lighter fences like pickets or decorative boundaries.
However, for heavy fences or areas with soft soil, there may be better choices than skipping concrete. Concrete provides extra strength for those conditions.
By choosing the correct method for your needs, you can secure fence posts effectively—even without concrete.
Step-by-Step Process of Setting Fence Posts Without Concrete
Setting fence posts without concrete is a great way to save time and money. It’s also a perfect option for light fences or areas with well-drained soil. Here’s a simple guide to help you get started.
Method 1: Using Packed Soil
Step 1: Prepare Your Tools
Before you start, gather the necessary tools: a post-hole digger, a shovel, a tamping tool, and a level.
Step 2: Mark Your Post Locations
Use a string line or measuring tape to mark where each fence post will go. Double-check the distance between posts to ensure they are evenly spaced.
Step 3: Dig the Holes
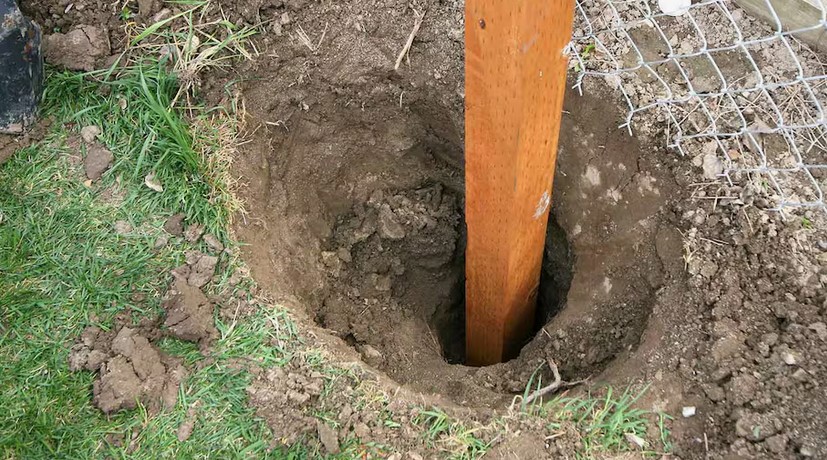
Using the post hole digger, dig a hole for each post. The hole should be about 3 times the width of the post and 1/3 of the post’s length deep. Make sure the hole is straight to avoid crooked posts.
Step 4: Place the Post
Put the post into the hole, ensuring it’s centered and standing straight. You can use a level to check that it’s upright.
Step 5: Pack the Soil
Start adding soil around the base of the post, packing it down as you go. Use the tamping tool to press the soil firmly, ensuring it’s tightly packed to prevent the post from moving.
Step 6: Continue Packing
Fill the hole about halfway, then tamp it down again. Repeat until the hole is filled. Make sure the post stays straight as you work.
Step 7: Check the Post
Once the hole is filled and packed, use the level one more time to ensure the post is still standing straight. If needed, adjust before the soil fully sets.
Step 8: Let the Soil Settle
Wait a few hours or even a day for the soil to settle around the post. This will help the post stay secure.
Method 2: Using Gravel for Extra Drainage
Step 1: Gather the Necessary Materials
In addition to the standard tools, you’ll need gravel. Choose crushed gravel or small stones to help with drainage around the post.
Step 2: Dig the Hole
Dig the hole the same way as before. This time, however, leave a little extra room at the bottom to allow for gravel.
Step 3: Add a Gravel Layer
Add about 4–6 inches of gravel to the bottom of the hole. Tamp it down to create a solid base for the post.
Step 4: Place the Post
Put your fence post into the hole, ensuring it is centered and straight.
Step 5: Fill with More Gravel
Start filling the hole with gravel, packing it down as you go. Unlike soil, gravel won’t shift easily, so tamping is essential to keep the post steady.
Step 6: Adjust the Post
As you fill the hole, make sure the post remains straight. Adjust, if necessary, before the gravel fills the hole.
Step 7: Final Layer of Gravel
Once the hole is almost filled, add a final layer of gravel on top and tamp it down to ensure the post is secure.
Step 8: Let the Gravel Settle
Just like with soil, allow the gravel to settle and harden around the post over time. This will help keep the post from shifting.
Method 3: Using Gravel and Soil Combo
This method combines the benefits of both soil and gravel, giving you the best of both worlds: soil for strength and gravel for drainage.
Step 1: Prepare the Hole
Dig the hole as you would for any post, making sure it’s deep enough to hold the post securely.
Step 2: Add Gravel First
Start by adding a 6-inch layer of gravel at the bottom of the hole to help with drainage.
Step 3: Place the Post
Place the post in the hole, ensuring it’s centered and level.
Step 4: Fill with Soil
Add soil around the post until it’s halfway full. Pack the soil down well.
Step 5: Add More Gravel
Add another layer of gravel around the post for extra stability and drainage.
Step 6: Finish with Soil
Finish by topping the hole with soil and packing it tightly to secure the post in place.
Step 7: Let It Settle
Allow the mixture to settle and harden. This combined approach creates a robust and stable base while ensuring good drainage.
Pros & Cons of Setting Fence Posts Without Concrete
Here are some pros and cons to consider before deciding.
Pros:
- Cost-effective: Without the need for concrete, you save money on materials and reduce overall project expenses.
- Quick Setup: Installing posts without concrete is faster, meaning you can get your fence up sooner.
- Easy to Fix: If a post shifts or needs adjustment, it’s easier to fix when not set in concrete.
- Better Drainage: Methods like gravel allow water to flow freely, preventing post-damage from moisture buildup.
- Environmentally Friendly: No concrete means less waste and fewer materials that can harm the environment.
Cons:
- Less Stability: For heavy-duty fences, concrete might provide a different strong hold than soil or gravel.
- Shifting Posts: Over time, soil or gravel can shift, causing the posts to lean or become unstable.
- Limited for Large Fences: Concrete is typically better for larger or more permanent fences that need extra support.
Wrapping Up
Setting fence posts without concrete can be a great option, but it’s not always necessary. It works well for lighter fences or areas with good drainage.
However, if you’re installing a heavy-duty or permanent fence, concrete might be the better choice. Consider the size of your fence, the soil type, and the local climate before deciding. If stability and long-term durability are important, concrete is often the best way to go.
On the other hand, for smaller projects, setting fence posts without concrete can be a cost-effective and quick solution.
Need a secure and professional fence for your commercial property? Choose Commercial Fencing Huntsville AL. Our expert team delivers lasting solutions that enhance security and privacy. Reach out for a quote today!